How to Create Custom Drupal Layouts for Layout Builder Through Code
Today, let’s explore How to Create Custom Drupal Layouts for Layout Builder Through Code.
Drupal’s Layout Builder provides a powerful and intuitive way to design flexible webpage layouts without delving deep into code. It empowers content editors to arrange content into visually appealing structures using a drag-and-drop interface. In this blog post, we’ll explore what Layout Builder is, how to enable it, and demonstrate how to create custom templates for even greater control.
What is Layout Builder?
At its core, Layout Builder is a Drupal module that lets you visually construct the layout of pages. Instead of being confined to a theme’s rigid structure, you gain the freedom to:
- Define Regions: Designate sections within your page (e.g., header, footer, main content, sidebar).
- Assemble Layouts with Blocks: Place and arrange different content blocks (text, images, menus, etc.) within these regions using drag-and-drop.
- Create Custom Templates: Craft template files for specific layouts to have precise control over HTML and region placement.
Enabling Layout Builder for a Content Type
Let’s assume you want to use Layout Builder on the ‘Article’ content type. Here’s how to enable it:
- Install Modules: Ensure you have the core Layout Builder module enabled (usually a default).
- Manage Display: Navigate to
/ admin / structure / types / manage / article / display(replace ‘article’ with your content type’s machine name). - Enable Layout Builder: Under the ‘Layout options’ section, check the box “Use Layout Builder”.
- Save Your Changes: Click ‘Save.’
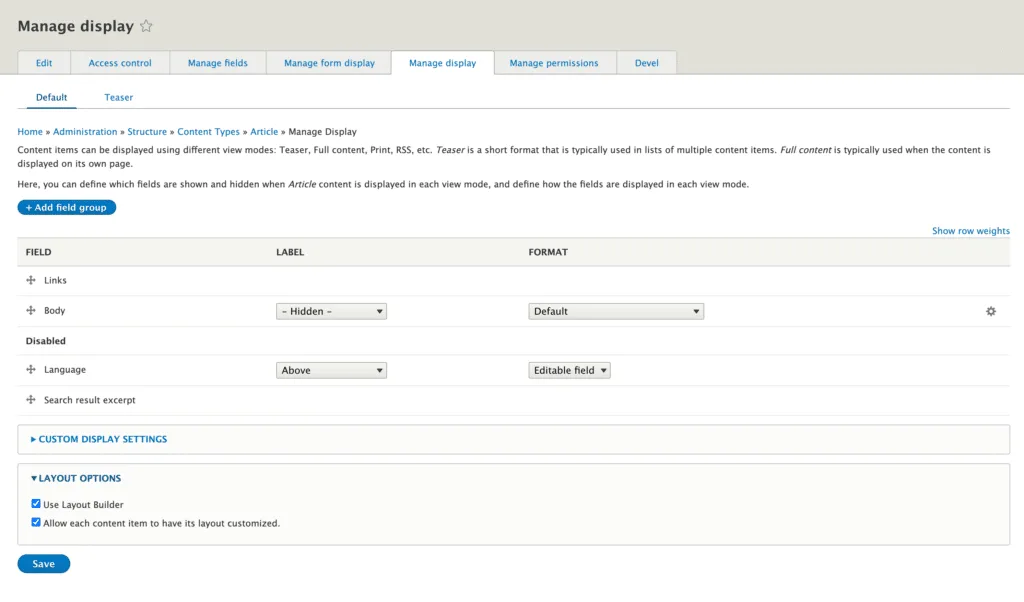
You can also opt to allow individual nodes (articles, in this context) to have their unique layout overrides. This means each article can have a distinct layout different from the default layout you’ve set for the ‘Article’ content type.
How to Create Custom Drupal Layouts
While your Drupal theme and some modules may offer some pre-built layouts, creating custom templates provides even greater control and flexibility. Here’s why you might need custom layouts:
- Tailored Page Designs: Build layouts that perfectly fit your content, instead of being limited to generic theme or module layouts.
- Easy Editing: Provide ready-to-use layouts that match your website’s style, making life simpler for your content editors.
- Consistent Look: Ensure your website looks great on every page, even when using layouts that weren’t included in your theme.
To create custom layouts, follow these steps:
THEME.layouts.ymlFile:- Create a file named
THEME.layouts.ymlin your theme’s root directory (replaceTHEMEwith your actual theme name). - Let’s use a quick example for a layout with a right sidebar. Add the following code, and remember to replace ‘EXAMPLE’ with a suitable prefix for your project:
- Create a file named
example_layout_right_sidebar:
  label: 'EXAMPLE: Content with Right Sidebar'
  path: templates/layout/example/sidebar
  template: layout--right-sidebar
  category: 'Example Columns: 2'
  default_region: first
  icon_map:
    - [top]
    - [first, first, second]
    - [bottom, bottom, bottom]
  regions:
    top:
      label: Top
    first:
      label: First
    second:
      label: Second
    bottom:
      label: Bottom
Explanation of the code:
- example_layout_right_sidebar: Unique name for the layout.
- label: The user-friendly name for this layout in Layout Builder.
- path: Where your layout’s template files are located.
- template: The main template file that defines your layout’s HTML structure.
- You’ll need a corresponding
layout--right-sidebar.html.twigfile in the specified path.
- You’ll need a corresponding
- category: Helps group layouts within the Layout Builder interface.
- default_region: Specifies where content blocks will initially be placed (in this case, the ‘first’ region).
- icon_map:
- This shows a basic visual preview in Layout Builder:
- One row at the top (
[top]) - Row with three columns: two wider ‘first’ columns and a narrower ‘second’ column.
- One row at the bottom (
[bottom, bottom, bottom])
- One row at the top (
- This shows a basic visual preview in Layout Builder:
- regions:
- Defines the named areas where you can place content:
- top: A region spanning the top of the layout.
- first: The primary content region (likely the left column).
- second: The sidebar region (likely the right column).
- bottom: A region spanning the bottom of the layout.
- You’ll use
{{ content.top }},{{ content.first }}, and{{ content.second }}to position your content in the twig template.
- Defines the named areas where you can place content:
- Template Files:
- In the folder, you specified under the
pathin your.layouts.ymlfile (e.g.,templates / layout / example / sidebar), create the Twig template files likelayout--right-sidebar.html.twig. - Here’s the template example:
- In the folder, you specified under the
{#
/**
 * @file
 * Default theme implementation for a media layout.
 *
 * Available variables:
 * - content: The content for this layout.
 * - attributes: HTML attributes for the layout <div>.
 *
 * @ingroup themeable
 */
#}
{% if content %}
 <div{{ attributes.addClass('row example-sidebar-layout example-right-sidebar') }}>

  <div class="example-container">

   {% if content.top %}
    <div {{ region_attributes.top.addClass('region--top example-sidebar-layout-top') }}>
     {{ content.top }}
    </div>
   {% endif %}

   <div class="example-sidebar-layout-middle">

    <div{{ region_attributes.first.addClass('col-sm-9 example-sidebar-column-left') }}>
     {{ content.first }}
    </div>

    <div{{ region_attributes.second.addClass('col-sm-3 example-sidebar-column-right') }}>
     {{ content.second }}
    </div>

    </div>

   {% if content.bottom %}
    <div {{ region_attributes.bottom.addClass('region--bottom example-sidebar-layout-bottom') }}>
     {{ content.bottom }}
    </div>
   {% endif %}

  </div>

 </div>
{% endif %}
- Clear Caches: Clear Drupal’s caches to register your new templates.
Using Your Custom Templates
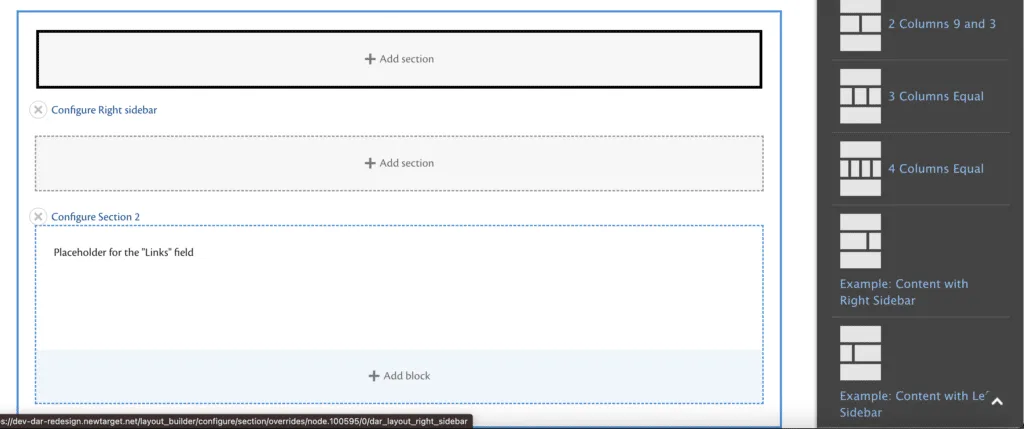
- When editing an ‘Article’ (or your chosen content type) node, switch to the ‘Layout’ tab.
- Your custom layouts should now be available for selection.
- Once you choose a layout, you can start adding content blocks into its designated regions.
Final Thoughts
Layout Builder and custom templates give you more flexibility to design your Drupal site the way you want. It might take a little practice to get comfortable, but the ability to create layouts that perfectly suit your needs is worth the effort. Play around and see what you can create. Happy debugging!